
Installing WordPress hosting on a shared server is as easy as a cakewalk. When you up your game to a virtual private server, it can get a little trickier if you do not have strong technical experience. What if you are don’t know how to install WordPress on a VPS?
We are here to help you out! The easiest way you can install WordPress on a virtual private server is by using the one-click installer. However, if you do not have cPanel/WHM and Softaculous you may not have that option. We have created the following tutorial on how to install WordPress by command line.
Install WordPress on VPS and Get Your Site Running
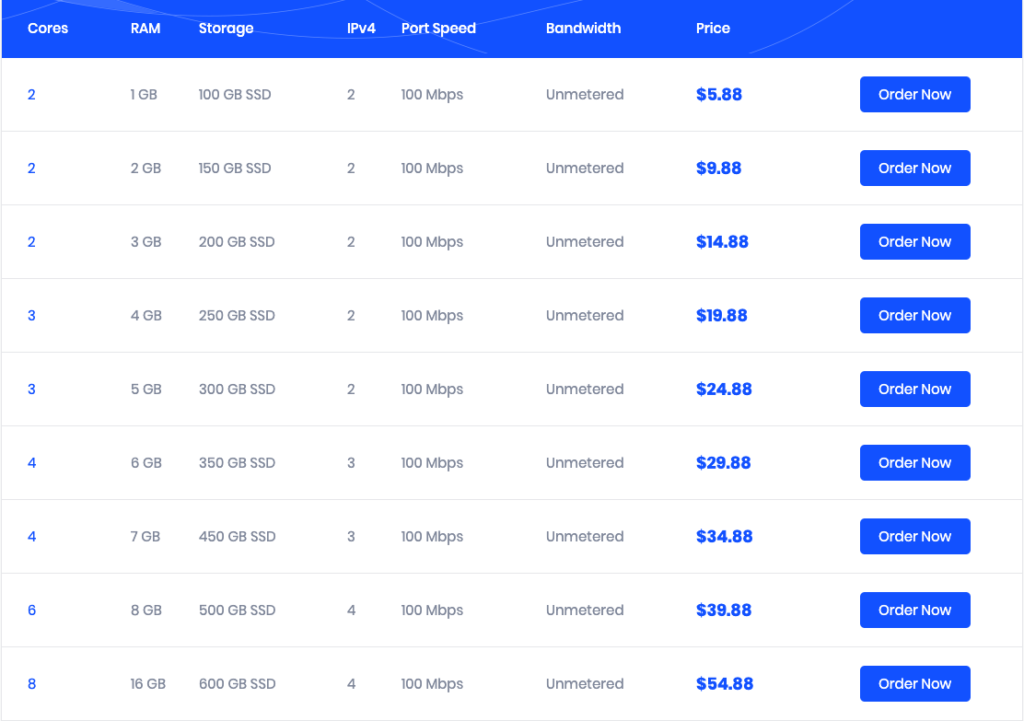
Before you delve into the process, you need to purchase one of DediPath VPS plans. We have optimised our servers for WordPress. The page load speed and performance will astonish you.
Don’t forget, you need your server’s root password and a client to access secure shell (SSH) like Putty.
Step 1: Install Putty
The first thing you should do is downloading the SSH application, Putty. You can use their official website for that. Check whether your operating system is 32-bit or 64-bit, then go with the suitable version of the software. You will get an executable file as the installer. Open it up and follow a few steps to finish the installation.
Step 2: Connect to Your VPS via SSH
Here, you need to open Putty. Type the IP address of your VPS in the given field and change the port number to 22. You will see multiple radio-boxes for Connection type. The one you must go with is SSH. Finally, click Open.
A command prompt window will open. Type root and hit enter. Most probably, it will ask you to provide the password. Do that too.
Entering the correct credentials will lead to displaying the name of your server.
Step 3: Install the Software to Run WordPress
Three things are essential for running WordPress; an HTTP server, PHP, and a database. We are going to install Apache, latest version of PHP, and MariaDB here. We already have a command prompt window by the end of Step 2.
You can simply copy-paste the following command to install all the three in one go.
“sudo yum install httpd mariadb mariadb-server php php-common php-mysql php-gd php-xml php-mbstring php-mcrypt php-xmlrpc unzip wget -y”
The command tells your server to install and setup all three tools. Depending on the speed of your server, the process will take a few minutes. Once it finishes up, you can type in more commands.
Step 4: Configure and Create a Database for WordPress using MariaDB
Unsecure WordPress sites may be susceptible to being hacked. To secure your site, you will want to block the remote access of the server to prevent anonymous entry. For that, you can use the following command.
“sudo mysql_secure_installation”
You can then hit the enter key when asked to enter the root password and it will become possible for you to set a new root password. Now, enter Y for all the four prompts.
Don’t forget the password you just typed in because it is needed in the next step.
You can login into your MariaDB account using the following command. Yeah, here you need the password.
“mysql -u root -p”
In order to prepare your database ready for usage, you need to run four more commands. Execute them one at a time. Don’t forget to replace user and password with a secure pair so that no one will ever get them.
“CREATE DATABASE wordpress;
GRANT ALL PRIVILEGES on wordpress.* to 'user'@'localhost' identified by 'password';
FLUSH PRIVILEGES;
exit”
Step 5: Install WordPress
It is the final step. Here, we are going to download the software, extract the files, and move them to the root directory. Don’t forget to run each line of commands separately.
“wget http://wordpress.org/latest.tar.gz
tar -xzvf latest.tar.gz
sudo cp -avr wordpress/* /var/www/html/”
It’s time to create a new Uploads folder and assign correct permissions to the files and folders.
“sudo mkdir /var/www/html/wp-content/uploads
sudo chown -R apache:apache /var/www/html/
sudo chmod -R 755 /var/www/html/”
Now, we have to rename the wp-config-sample.php file.
“cd /var/www/html/
sudo mv wp-config-sample.php wp-config.php
sudo nano wp-config.php”
The last command you ran will open the wp-config.php file on the nano editor of the command prompt. You can use the arrow keys to navigate. Replace the following fields with the same data you entered in the previous step.
“define('DB_NAME', 'wordpress');
define('DB_USER', 'user');
define('DB_PASSWORD', 'password');”
Once you replace the fields, enter CTRL+O to save the changes and CTRL+X to close the nano editor.
The final thing left to do is to configure your VPS to allow HTTP and HTTPS connections.
“sudo firewall-cmd --permanent --zone=public –add-service=http
sudo firewall-cmd --permanent --zone=public –add-service=https
sudo firewall-cmd –reload”
You can now access the WordPress installer by visiting http://yourvpsip {Don’t forget to type your VPS’s IP here}.
There you go!
Conclusion
I know you have gone through a lot of commands. Let’s retrospect. Have you ever encountered any issues? You only had to copy-paste a few commands, right? Use this method to install WordPress on any VPS server without any hassle.